Word 2007 provides for the ability to apply fonts, colors, styles and other formatting options consistently across documents via its themes capabilities. Numerous themes are available both by default and from the Microsoft Office website and you can create your own themes. By using themes, an individual or organization can ensure that documents maintain a consistent look and feel.
Instructions
Access or create a Word 2007 document. Themes are easiest to apply and create to Word documents that already contain information that has been formatted with styles, graphics and other options that the theme can modify.
Use an included theme. Word 2007 includes a number of themes for various types of documents. To access an included theme, select the "Page Layout" ribbon, then click on the "Themes" icon. A drop down dialog will show the available theme. Mouse over a theme to preview how it looks for your document and click on a theme to apply it.
Download a theme from the Microsoft Office website. A number of themes are also available from Microsoft, and can be accessed by clicking on "More themes on Microsoft Office Online" on the "Themes" dialog. At the website, browse through the available themes and click on the highlighted name of a theme to download. Click "Continue" if your system has not yet been verified by the Microsoft Office Genuine Validation system and follow the directions. Otherwise, click "Download Now," save each file to the default location and then select the new theme from the "Custom" section of the "Themes" dialog.
Customize a theme. You can customize a theme by changing the colors, fonts and effects to be applied. Each setting is available in the drop down lists next to the "Themes" icon on the "Page Layout" ribbon. Once you have customized the theme and would like to save the settings as a new theme, select "Save Current Theme" from the "Themes" dialog. Give the theme a name and save it in the default location by selecting "Save."
12+ Tips and Tricks to Work Faster in Microsoft Outlook
Love it or hate it, Microsoft Outlook is still the email client at many offices. It's been a while since we took a look at good old Outlook, so here are some of our favorite tricks well worth revisiting to increase your productivity in this all-in-one email, calendar, tasks, and notes program.
The instructions and details in this post are based on Outlook 2010, but they should work with both earlier and later versions of Outlook, except where otherwise noted.
General Shortcuts
The shortcuts below work across the whole program, so you can get more done whether you're reading emails or adding meeting events to your calendar.
1. Learn Outlook's keyboard shortcuts. Like Microsoft Word, Excel, and other Office apps, Outlook has unique keyboard shortcuts so you don't have to waste time moving your mouse around or drilling down through menus. Learn the ones you use most and you'll speed through your Outlook tasks. MakeUseOf has a handy Outlook keyboard shortcuts cheat sheet you can download or print out. Among the most useful:
Ctrl+R: reply to email
Alt+R: reply to all in email or switch to the work week calendar view
Alt+W: forward email or switch to the weekly calendar view
Ctrl+M: F9 to Send/Receive all
Alt+S: Send email
Ctrl+G: open the "Go to date" dialog to jump to any date in the calendar
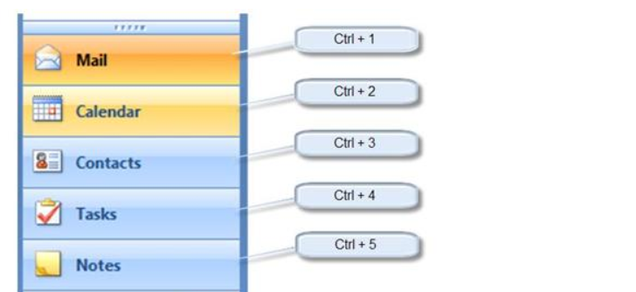
You can also switch between mail, calendar, contacts, and other items in the navigation pane by hitting Ctrl + [the place number of the item], e.g.:
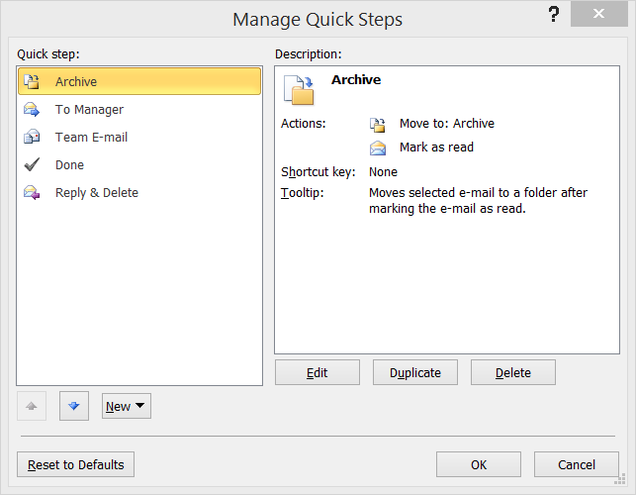
2. Take advantage of Outlook's Quick Steps. For those unfamiliar, Quick Steps is the killer feature Microsoft introduced with Outlook 2010. They're shortcuts to any multi-step action you can think of, such as moving emails to a specific folder and marking them as read or forwarding an email to your team and flagging it at the same time. It makes short work of repetitive tasks, and you can create your own Quick Step actions.
3. Create a new item from your clipboard. Hat tip to fellow Life hacker Walter Glenn for this tip (and others in this piece):
Copy any text to your clipboard, then in Outlook press Ctrl-V. Outlook creates a new message (or note or whatever item, depending on the folder you're viewing) with the text already pasted.
So instead of creating a new item in Outlook, and then copying and pasting text in, you do both in one step.
Email Shortcuts
Even though Gmail and other webmail services are quite capable, Outlook is no slouch when it comes to sorting, filtering, categorizing, and otherwise wrangling your inbox to your needs.
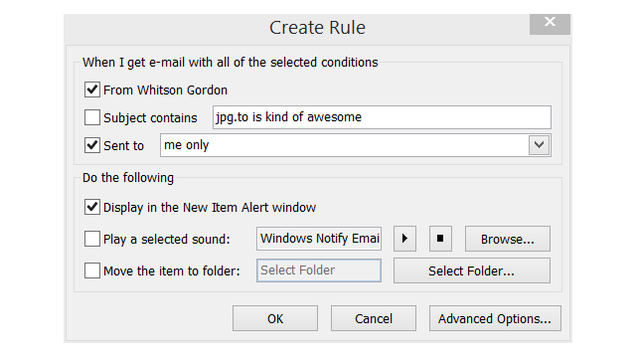
4. Limit desktop notifications to only the most important emails. It's terribly distracting to constantly be told "you've got mail!" but you still want to get notified for the most important alerts. In Outlook, set desktop notifications only for those VIP messages. Canadian legal magazine Slaw offers a detailed tutorial for how to do this, but, essentially, first you'll turn off all desktop alerts under the Mail Options, then create an Outlook rule to display alerts for messages from specific people sent only to you. For example:
5. Flag messages—fast. With a message or two selected, jut hit the insert key to toggle the flag on or mark it done.
6. Get emails that aren't sent directly to you out of your inbox. In an old post (still worth looking at if you're using Outlook), Scott Hanselman details his GTD organization method for Outlook. One of the best tips is to use a special "Inbox – CC" folder to gather all the emails that aren't sent directly to you; that way, the inbox is focused on only the most important emails. To set this up, go to Rules > New Rules…. Then click the "Advanced Options" button. In the Rules Wizard, select "where my name is not in the To box" and then in the next screen, "move it to the specified folder." (Alternatively, set up a VIP email folder and move "emails sent only to me" into that special folder.)
7. Use email templates to never write the same email twice. Tired of sounding like a broken record? For those emails you send often, such as requests for information or reminders of due invoices, save the email as a template via File > Save As… > Outlook template. Then, to use the template, go to New Items > Choose Form… and look in your "User Templates in File System" to browse for the template you saved. Or, even quicker, double-click the OFT file from Windows Explorer to create a new message from that template. You can also use text expansion to accomplish this across any program on your computer.
8. Create search folders for your most important emails. What are your most frequently accessed emails? Maybe they're emails from your boss or certain subjects (now where's that TPS report?). For any search you perform often, just save the search for quick access. Click on Search Folders in the left navigation menu, select "New Search Folder," and then either use the wizards or manually customize the search to your specifications.
9. Quickly save emails as files. If you want to save certain emails for posterity, you have a few methods at your disposal. While you can individually save any email through the File > Save As... menu (options: text, HTML, Outlook Message format or .msg, HTML, .mht), it's far faster to save emails by dragging them to the desktop or Windows Explorer. This will save them in Outlook's proprietary .msg format, with the subject as the file name.
You could also use VBA scripts like this and these to automatically (or semi-automatically) save emails to your local hard drive as individual messages, freeing them from the .PST or .OST file Outlook keeps them in.
Tasks, Calendar, Notes, and Journal
Outlook isn't just an email client. It's a full-fledged Personal Information Manager. Having everything in one place has its advantages, but there are still ways to use all these features more effectively.
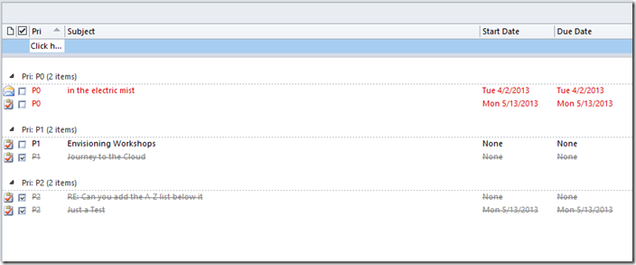
10. Group tasks by custom priority. If you want to use Outlook as your to-do manager too, MSDN's JD Meier suggests this organizational structure: In addition to adding a start date to each of your tasks, add a custom priority field (such as P0, P1, and P2). Then you can group your tasks by that custom field so you can see at a glance which ones to work on at the right time. For example:
This method might also work well with productivity techniques like working on tasks in batches—such as the Workstation Popcorn way of working productively from home—or if you want to organize your tasks by the amount of time they take.
11. Use natural language to create a calendar event. Don't waste time scrolling through the monthly date picker to find the exact date for an appointment or meeting. In the date field, type naturally "Independence Day," "three days from tomorrow," and so on.
12. Save Outlook notes, events, and any other item to the desktop for quick access.It's not just emails you can save to your computer outside of Outlook: calendar events, notes, contacts, and everything else can be dragged to the desktop or a Windows folder as individual items for quick access later. Double-click the item—even if Outlook isn't open—and it'll open right away in Outlook.
Bonus (for Outlook 2010 and earlier): Use Outlook as an automatic time tracking tool. This one's been deprecated in Office 2013, but if you have an earlier version of Outlook, you can use the Journal to automatically log your tasks, time, Office documents usage, and so on. You have to click on the left navigation pane's "More" button to find the Journal icon and then enable the Journal to track messages from specific contacts, meeting requests, and time spend in other office programs.
You'll then see a timeline and detailed log of all these events, which is great for those of us who have to keep timesheets, invoice clients, or just want to jog their memories about where the time really went.
These are all just scratching the surface of Outlook's capabilities. Loaded with options and features, as well as VBA scripts you can install or write yourself, Outlook is a powerful tool for organizing your daily life. For more tips and tricks, see our previous collection of Outlook tips or share your favorites here.
Get Things Done Faster with these Microsoft Word Tips
Here are 10 tips and tricks for Microsoft Word that will help you get things done faster and more efficiently than ever before. I have created theanimated GIFs with Word 2013 but the tricks will work just fine with older versions of Microsoft Office as well. Let’s get started.
1. Select Text Quickly
You can triple-click anywhere within a paragraph to select the entire paragraph in Word. Or press the CTRL key and click anywhere within the sentence to select the entire sentence.
You can also select rectangular blocks of text in a Word document, similar to the marquee tool in Photoshop, and apply formatting to the selected area. Hold down the ALT key and drag your mouse to select any rectangular area.
2. The Extended Clipboard
Word has a useful “Spike” feature that you can use cut (move) text and images from multiple locations in a document and paste them all at once to a different location.
To use Spike, select some text, images or other objects in your document and press CTRL+F3 to move that selection to the Spike. You can highlight and append more entries to the same Spike using the CTRL+F3 shortcut. Now press Ctrl+Shift+F3 to paste the content of the Spike anywhere in the document.
3. Move Around Faster
If you are working on a lengthy Word document, you can press the Shift+F5 keyboard shortcut to cycle through the spots that you have edited most recently. Also, when you open an existing document inside Word, the same Shift+F5 shortcut will take you to the location that you were working on when the document was last closed.
4. Change the Sentence CASE
Select some text in Word and press Shift+F3 to quickly change the case of the selection. It toggles between UPPERCASE, lowercase and Camel Case (first letter in capital) and should come handy if you’ve accidentally left the CAPS LOCK key on while typing.
5. Write Anywhere on a Page
Did you know that you can use your Word document as a whiteboard and write your text anywhere on the page. Just double-click wherever you want to type your text and start writing.
6. Convert to Plain Text
When you copy snippet from a web page into Word, all the styles and formatting are retained. There’s however an easy way to remove the styling from any block of text in Word – just select the block and press Ctrl+Space Bar and the rich text will be transformed into plain text.
7. Move Text without Copy-Paste
Most people use the Cut-Paste (Ctrl-x Ctrl-v) route to move text from one location to another within a Word document but there’s an alternate way as well. Highlight any block of text, press F2 and then place the cursor at the spot where you wish to move that text. Press Enter and the selection will be moved.
8. Insert Unicode Characters
If you know the Unicode code of a character, you can quickly add it to your document by typing the code followed by Alt+x. For instance, the code for Indian Rupee symbol is 20B9 – type 20B9, press Alt+x and the code will be replaced by the actual Rupee symbol.
9. Add Placeholder Text
There’s a Lorem Ipsum generator built inside Word to help you insert filler text anywhere inside the document. Type =rand(p,l) and press Enter to insert ‘p’ number of paragraphs each having ‘l’ lines. For instance, =rand(3,6) will generate 3 dummy paragraphs with 6 lines each.
The other option is =lorem(p,l) that fills your Word document with pseudo-Latin text commonly used in web design projects.
10. Word’s Hidden Calculator
Your copy of Microsoft Word has a hidden calculator that can handle all the common arithmetic operations. You can write the Maths expression in your document, highlight it and press the Calculator button – the results of the calculation will be displayed in the status bar.
Go to Word Options -> Quick Access Toolbar, switch to All Commands and add the Calculate Command to your Quick Access Toolbar.